Maida Heatter's Popovers-Famous Fridays

For this week's edition of Famous Fridays, I chose a tried and true baker to showcase: Maida Heatter! For those of you who don't know her, Maida is often referred to as "The Queen of Desserts", and it is a richly deserved title! Beginning with "Maida Heatter's Book of Great Desserts"(published in 1974), she went on to publish seven more amazing baking cookbooks, most of which I own, in various conditions (you'll see what I mean in a moment). Her style is very detailed but not excessively so and though sometimes the procedures are complex, they are never fussy and are easy to master, with little helpful hints along the way. And the results are always outstanding...case in point--these popovers!
This is what I meant by "various conditions". This was my mom's copy before it was bequeathed to me and as you can see, it has been well used:

Hanging together by a thread (0r rubberband)--I cherish this one!
Maybe one day, I'll get a new copy if the book is still in print, but for now it's a prized possession and it's taught me so much of what I know about baking, ingredients and kitchen utensils. Time and again I find myself turning to Maida for advice and recipes and I knew that she would feature largely in my Famous Friday posts. I really had trouble choosing what to make and finally settled on these popovers because I realized I hadn't made a breakfasty thing for the blog yet. But when I say settled, that is in no way meant to be derogatory--these popovers are a crisp, buttery, eggy marvel--both light and satisfying at the same time and though they look complicated, they are really very easy to make.

Non-stick popover pan--nice to have

The ramekin comes in a close second!
It all starts with either a popover pan or 4 oz. ramekins--both work really well--the popover pan is just a teensy bit easier. All you do is butter the cups very generously with softened butter and then make the batter which is nothing more than eggs, milk, melted butter, flour and salt which are lightly mixed together,

And then strained at least once to remove any lumps ( I had to do it twice)

Then you pour it into some sort of pitcher,

And then you either cover it and store it in the fridge till morning (that's what I did) or you pour it into the cups and bake it for about 50 minutes.

The popovers taste best when right out of the oven, so if you are not going to eat them all right away, I suggest you make only a couple at a time-in my family, we did not have that problem at all-they were almost all gobbled up. In fact, because I wanted to see what a reheated one would taste like the next day, I had to hide one. It's definitely not as good as the first bake, but still tastes pretty darn good.
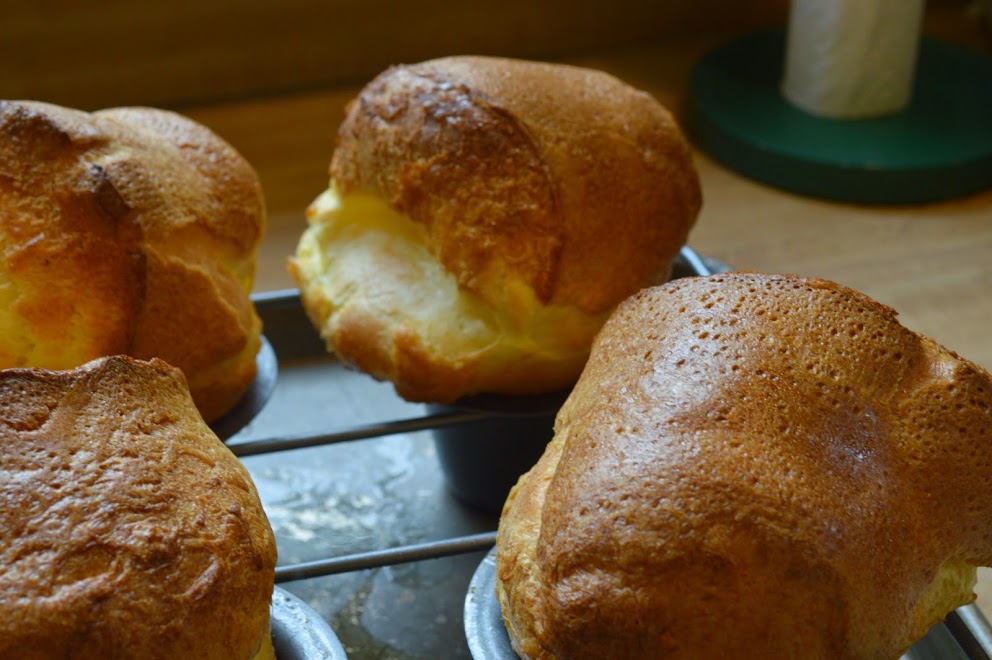
Because the batter is confined to a mold, the bottom sets and the steam forces these to rise, creating an alien sort of life form. And these babies are perfectly named as the batter literally "pops over" the pan.

The outside is so crunchy and the inside is almost like a souffle--airy and light with crevices and layers of flavor. They are scrumptious on their own but also very delicious with some jam.

See all that steam escaping!
If you want to make any brunch or breakfast special, I suggest you add these to the menu. The oohs and aahs you receive will be well worth it and then people will hail you "Queen of Desserts" just like Maida!
Maida Heatter's Popovers-Famous Fridays
Makes 8-10 depending on the cup size
Prep Time: 15 minutes; Bake Time: About 1 hour; Total Time: 1 hour and 15 minutes
Ingredients
- Unsalted butter softened for greasing the molds
- 6 large eggs
- 2 cups milk (I used whole)
- 6 tablespoons melted unsalted butter
- 2 cups flour, sifted
- 1 teaspoon salt
The Recipe
1. If making immediately, preheat oven to 375ºF and generously grease the popover muffin cups or ramekins and place on a baking sheet (If making the following day, skip to Step 2).
2. In a large bowl, beat the eggs lightly with a whisk. Add the milk and melted butter and stir to combine. Gradually add in the flour and salt and beat until the mixture is smooth but don't over beat it. If the mixture is not smooth, strain it into another large bowl ( I did this twice and you really have to push the mixture through the sieve.)
3. Pour the mixture into a pitcher or measuring cup and either refrigerate or pour into cups, filling almost to the top.
4. Bake for 50 minutes. Do not open oven door during baking or they will sink.
5. After 50 minutes, remove the popovers from the oven and using a small sharp knife, cut several slits in the top of each one to release the steam. Return the popovers to the oven for another 5-10 minutes to become even more golden brown. Remove from oven and immediately unmold popovers. Place on plate or a napkin-lined basket but do not cover or they will get soggy. Serve plain or with butter and jam.
6. If you've made it the day before and kept the batter cold, give it a gentle stir before proceeding with Step 3.
7. Popovers can be stored wrapped in plastic for at least one day at room temperature. Reheat in a 350ºF oven on a baking tray for about 5-10 minutes until crisped up.
Enjoy!